There is nothing more disheartening than reaching into the freezer for a comforting scoop of premium Vanilla Ice Cream after a long Canadian winter day, only to find the surface coated in a jagged layer of frost. This textural degradation, often dismissed as inevitable freezer burn, fundamentally alters the mouthfeel and flavour profile of your dairy indulgence, turning a creamy experience into a watery, crunchy disappointment. Most households assume the manufacturing carton lid is engineered to protect the product, but this common misconception is exactly why so many litres of high-quality dessert end up in the green bin before their time.
The secret to preserving that factory-fresh churn texture lies not in lowering your freezer’s temperature, but in a specific physical modification technique involving a barrier method most home cooks ignore. By defying the standard practice of simply snapping the lid back on, you can effectively pause the sublimation process that draws moisture out of the cream. This simple, two-second adjustment ensures your next scoop is as velvety as the first, regardless of how long it has been sitting next to the frozen peas.
The Thermodynamics of Ice Crystal Formation
To understand why your Vanilla Ice Cream degrades, one must understand the volatility of water within a dairy emulsion. When ice cream is stored, the water content is in a constant battle with the dry, cold air of the freezer. Through a process called sublimation, ice turns directly into water vapour without melting. This moisture migrates to the coldest surface available—often the lid or the walls of the carton—leaving the ice cream dehydrated.
Simultaneously, a phenomenon known as recrystallization occurs. Small ice crystals, which are desirable for a smooth texture, melt slightly during minor temperature fluctuations (such as opening the freezer door) and refreeze onto larger, existing crystals. Over time, this creates the sharp, gritty texture that ruins the palate. The standard cardboard or plastic lid leaves a “headspace”—a gap of air between the ice cream and the lid—which acts as a breeding ground for these thermodynamic shifts.
Comparative Analysis: Storage Integrity
The following table illustrates the dramatic difference in preservation between standard habits and the direct-contact method.
| Storage Method | Air Exposure (Headspace) | Expected Shelf Life | Texture Retention |
|---|---|---|---|
| Carton Lid Only | High (Direct Air Contact) | 7-10 Days | Rapid formation of surface crystals; gummy texture develops. |
| Lid + Foil Over Rim | Moderate | 14 Days | Slight protection; air pockets still permit sublimation. |
| The Press Method (Plastic Wrap) | Zero (Vacuum Effect) | 3-4 Months | Optimal Integrity; maintains original churn profile. |
Understanding this breakdown reveals that air is the primary enemy of frozen dairy, leading us to the specific application technique required for total preservation.
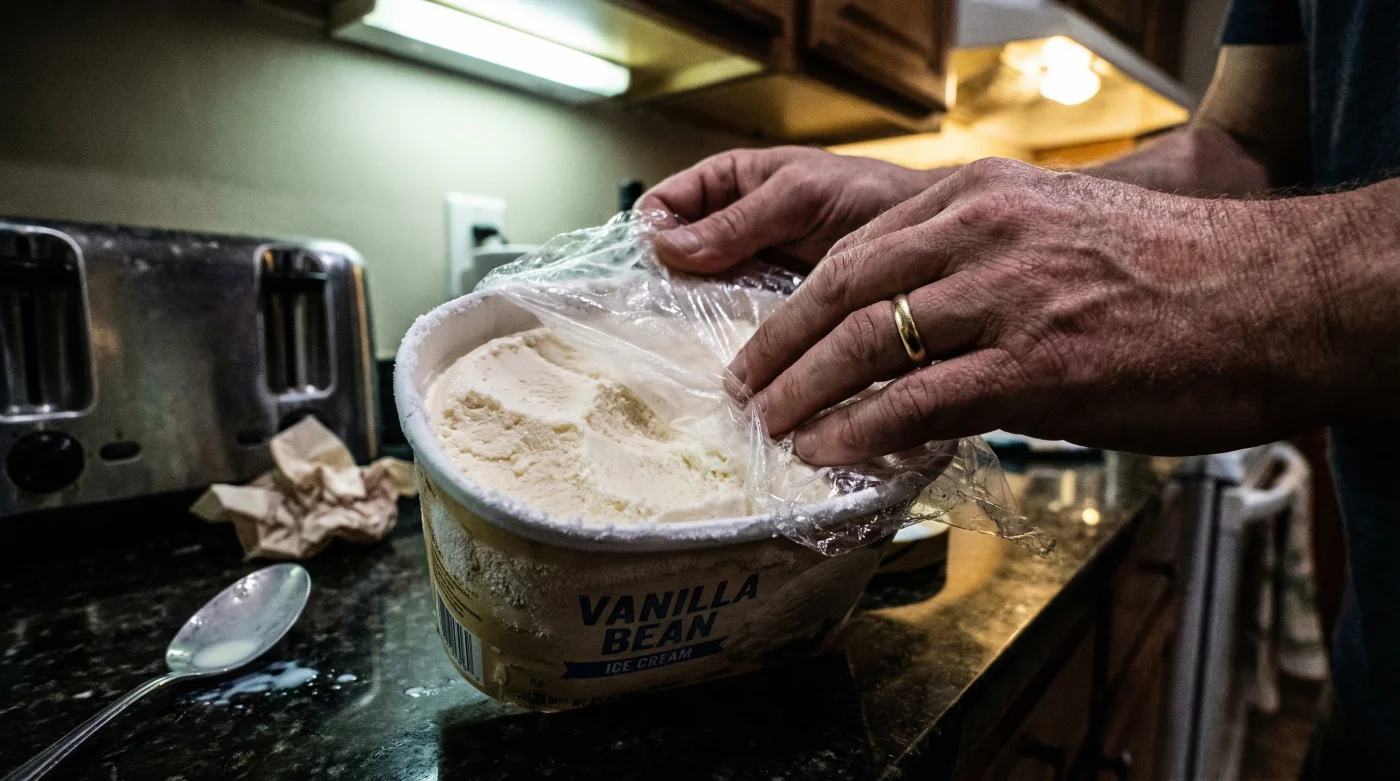
The Direct-Contact Protocol: How to Seal Properly
- Tomato Paste Must Fry In Olive Oil Before Adding Liquids
- Vodka Added To Pie Dough Eliminates Gluten Development Creating Flakiness
- Garlic Cloves Microwaved For Ten Seconds Peel Flawlessly Without Sticking
- Mayonnaise Replaces Butter On Grilled Cheese Sandwiches Preventing Burned Crusts
- Fresh Celery Wrapped In Aluminum Foil Outlasts Plastic Bag Storage
To execute this correctly, ensure the ice cream surface is relatively flat. Take a piece of plastic wrap (cling film) and press it firmly against the entire surface of the ice cream, ensuring it touches the edges of the carton. Smooth out any air bubbles with the back of a spoon. The goal is to create an airtight seal between the dairy and the freezer environment. Only then should you replace the cardboard lid.
Thermodynamic Stability and Dosing
Temperature management is just as critical as the physical barrier. The table below details the scientific parameters for maintaining the emulsion.
| Parameter | Optimal Metric | Scientific Impact |
|---|---|---|
| Storage Temp | -18°C to -20°C (0°F to -4°F) | Prevents the glass transition phase where syrup separates from ice. |
| Serving Temp | -12°C to -14°C (10°F to 6°F) | Allows fat globules to soften for maximum flavour release. |
| Thaw Time | 5-10 Minutes (Countertop) | Reduces thermal shock compared to microwaving. |
With the barrier in place and temperatures dialed in, the choice of material becomes the final variable in your preservation strategy.
Diagnostic Guide: Identifying Degradation
Even with the best intentions, improper handling can lead to spoilage. Use this diagnostic list to troubleshoot your current stock of Vanilla Ice Cream:
- Symptom: Gummy or Chewy Texture
Cause: Temperature abuse. The ice cream has thawed and refrozen slowly, causing lactose to crystallize (sandiness) or stabilizers to separate. - Symptom: Shrinkage (Pulling away from carton walls)
Cause: Dehydration. Significant moisture loss due to lack of a surface barrier, leading to volume reduction and intense flavour concentration. - Symptom: “Snow” on Surface
Cause: Sublimation. Water vapour from the ice cream has condensed and frozen on the lid, then fallen back onto the product.
Material Selection: The Quality Matrix
Not all wraps are created equal when it comes to long-term freezer storage. In Canada, where dry winter air can infiltrate even closed appliances, the permeability of your wrap matters.
| Material Type | Permeability Rating | Recommendation |
|---|---|---|
| PVC Cling Film | Low Permeability | Ideal. Creates a tight static cling that conforms to the uneven surface of the scoop marks. |
| Wax Paper | Moderate Permeability | Avoid. Does not adhere to the surface, leaving air gaps for crystal formation. |
| Aluminum Foil | Zero Permeability | Conditional. Good barrier but difficult to mold perfectly to the ice cream surface without tearing. |
By selecting a high-cling PVC film and applying it directly to the product, you safeguard the structural integrity of your dessert against the harsh Canadian elements.
Correct Placement Within the Freezer
Finally, where you place your protected carton is vital. Avoid the freezer door at all costs. The door is the warmest part of the unit and experiences the most drastic temperature fluctuations every time you open it to grab ice or frozen berries. Store your Vanilla Ice Cream at the very back of the freezer, on a lower shelf if possible. This area maintains the most consistent temperature, essential for preventing the microscopic melt-refreeze cycles that the plastic wrap helps mitigate.
By combining the Direct-Contact Protocol with strategic placement, you ensure that every scoop remains as pristine as the day it was churned.
Read More