For many Canadian home cooks, switching to stainless steel cookware is a rite of passage that often ends in frustration. You invest in high-quality, professional-grade pans expecting restaurant-quality sears, only to find your expensive salmon filet or morning omelette hopelessly fused to the metal surface. The immediate reaction is to blame the pan or assume that stainless steel requires an excessive amount of fat to function properly. However, the culprit is almost always a misunderstanding of thermal dynamics. Most cooks have been trained by non-stick cookware to add oil immediately after putting the pan on the stove, a habit that guarantees sticking when applied to raw steel.
There is a precise, scientific window of opportunity where stainless steel becomes naturally non-stick, mimicking the slick properties of Teflon without the synthetic chemicals. This phenomenon relies on a specific temperature threshold that closes the microscopic pores of the metal. If you miss this window—by adding fats too early or too late—the chemical bond between food and metal becomes unbreakable. The secret lies in a simple visual diagnostic test that requires nothing more than a few drops of tap water, yet it serves as the ultimate gatekeeper to professional cooking results.
The Thermodynamics of the Leidenfrost Effect
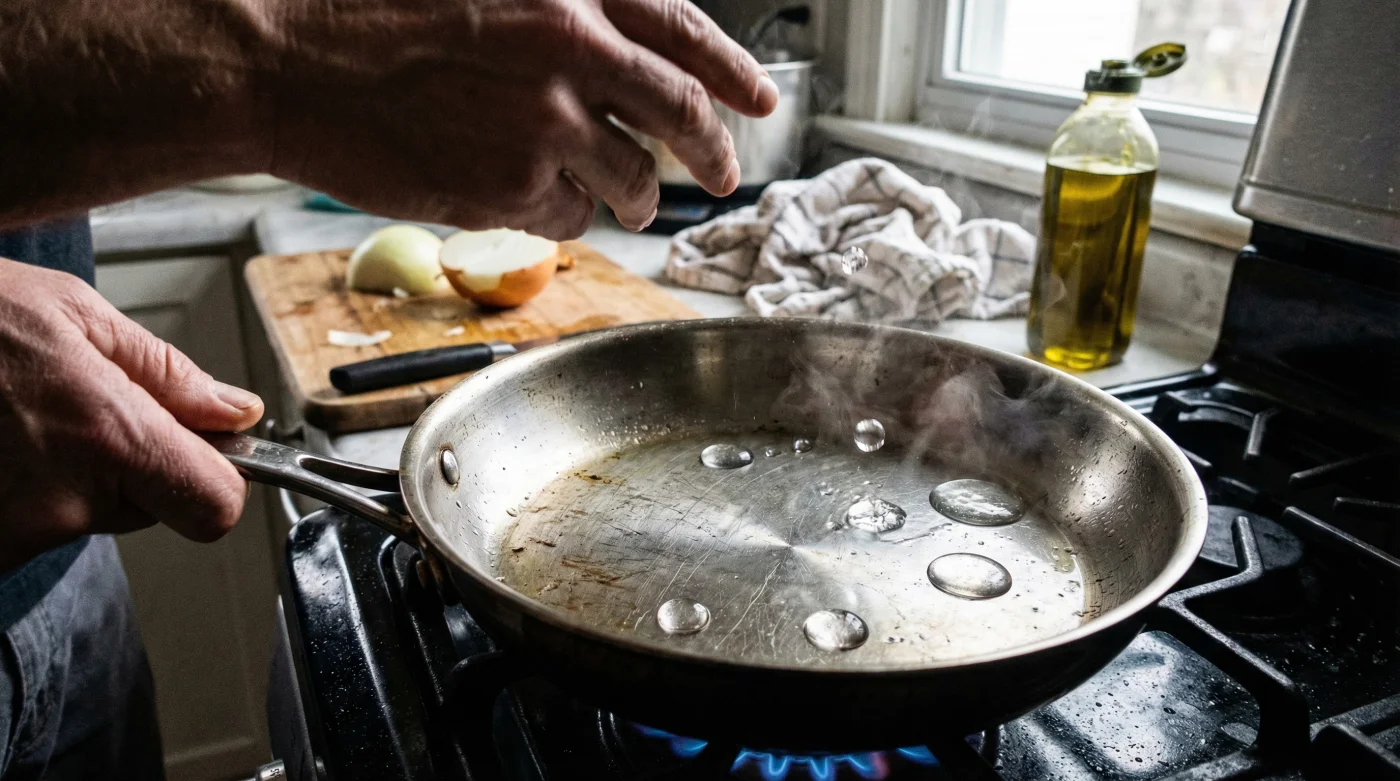
To understand why food sticks, one must look at the surface of the pan under a microscope. To the naked eye, stainless steel looks smooth, but at a microscopic level, it is riddled with pores and crevices. When the pan is cold or lukewarm, these pores are open. If you pour oil into a cold pan, the oil seeps into these fissures. As the metal expands with heat, the pores close, trapping the oil and the food inside the metal structure, creating a mechanical bond that tears the food apart when you try to flip it.
The solution is the Leidenfrost Effect. This physical phenomenon occurs when a liquid comes into contact with a surface significantly hotter than its boiling point. A layer of vapour forms instantly beneath the liquid, preventing it from touching the surface physically. When your pan reaches the correct temperature (approximately 193°C or 380°F), water droplets will no longer evaporate instantly; instead, they will skid across the surface like mercury. This confirms the metal has expanded sufficiently to close the pores, creating a temporary, natural non-stick surface ready for oil.
Comparison: Cookware Surface Behaviour
Understanding how stainless steel behaves compared to other materials highlights why this temperature test is exclusive to this medium.
| Cookware Material | Surface Characteristic | Pre-Heat Strategy | Reacts to Water Test? |
|---|---|---|---|
| Stainless Steel | Micro-porous (contracts with heat) | Critical: Must heat dry before oiling | Yes (Mercury Ball effect) |
| Non-Stick (Teflon) | Chemically sealed | Avoid: High heat damages coating | No (Risk of toxic fumes) |
| Cast Iron | Porous but seasoned (polymerized oil) | Moderate: Relies on seasoning layer | No (Water damages seasoning) |
Once you understand that heat is the sealant for your pan, you can master the exact method to achieve the perfect surface.
Step-by-Step: Executing the Water Drop Test
Achieving the perfect temperature is not about high heat; it is about sufficient heat. Many home cooks make the mistake of cranking the burner to ‘High’ and scorching the pan. The goal is to reach the Leidenfrost point using medium to medium-high heat to ensure even distribution.
The Protocol
- Step 1: The Dry Heat. Place your clean, dry stainless steel pan on the burner. Turn the heat to medium. Do not add oil yet.
- Step 2: The Wait. Allow the pan to heat for approximately 2 to 3 minutes. The exact time depends on the thickness of the ply (e.g., 3-ply vs. 5-ply).
- Step 3: The Test. Wet your fingers or use a teaspoon to flick a small amount of water onto the surface.
- Step 4: The Diagnostic.
- Fizzle & Evaporate: The pan is too cold (under 190°C). Wait another 30 seconds.
- Explosive Splatter: The pan is far too hot. Remove from heat immediately to cool.
- The Mercury Ball: The water forms a single, cohesive bead that glides effortlessly across the pan without evaporating. This is the signal.
- Step 5: The Oil Strike. Wipe out the water bead with a paper towel (carefully). Add your oil. It should shimmer immediately. Lower the heat slightly to your cooking temperature and add food.
- Tomato Paste Must Fry In Olive Oil Before Adding Liquids
- Vodka Added To Pie Dough Eliminates Gluten Development Creating Flakiness
- Garlic Cloves Microwaved For Ten Seconds Peel Flawlessly Without Sticking
- Mayonnaise Replaces Butter On Grilled Cheese Sandwiches Preventing Burned Crusts
- Fresh Celery Wrapped In Aluminum Foil Outlasts Plastic Bag Storage
Oil Viscosity and Temperature Dynamics
Once the pan passes the water drop test, it is sitting at roughly 195°C to 205°C. This is the danger zone for many organic fats. Adding butter or unrefined olive oil at this stage will result in instant burning, creating bitter flavours and potentially carcinogenic compounds. You must pair the Leidenfrost technique with oils capable of withstanding the initial thermal shock.
Temperature and Oil Reaction Guide
Use this table to match your cooking fat to the heated pan.
| Temperature Phase | Pan Surface Temp (°C) | Visual Cue | Safe Fats to Add |
|---|---|---|---|
| Underheated | 100°C – 140°C | Water sizzles/steams | None (Pores still open) |
| Leidenfrost Zone | 190°C – 210°C | Water beads/glides | Avocado Oil, Grapeseed, Ghee |
| Overheated | 230°C+ | Oil smokes instantly | None (Cool down immediately) |
Even with the correct oil, subtle mistakes in the process can lead to sticking; diagnosing these errors is key to consistency.
Troubleshooting: Why Your Food Is Still Sticking
If you have performed the test and food still adheres to the surface, you are likely encountering a secondary variable. Cooking is chemistry, and variables such as moisture content in food or residual proteins on the pan can interfere with the thermal barrier.
Diagnostic Checklist:
- Symptom: The water balled up, but the oil smoked immediately upon contact.
Cause: The pan was left too long after the test. The temperature exceeded the smoke point of the oil. - Symptom: The food stuck after adding cold ingredients.
Cause: Thermal Shock. Adding a large, cold steak or cold liquids dropped the pan temperature below the Leidenfrost threshold too quickly, re-opening the pores. Always temper meat to room temperature. - Symptom: Sticky residue remains after cleaning.
Cause: Polymerized fats. Old oil has hardened into the pores. The pan needs a deep clean with vinegar or a specialized stainless steel cleaner to restore the raw metal surface.
To maintain the pan’s ability to pass the water test, you must be rigorous about which oils you use for high-heat searing versus low-heat finishing.
The Oil Selection Hierarchy
Not all oils are created equal when dealing with hot stainless steel. The ‘Mercury Ball’ stage is inherently a high-heat environment. Using low-smoke point oils destroys the non-stick effect because the oil breaks down into sticky gum.
| Oil Category | Smoke Point (°C) | Verdict for Stainless Steel Seating | Best Use Case |
|---|---|---|---|
| Avocado Oil | 271°C (520°F) | The Gold Standard | High-heat searing, wok-style cooking |
| Grapeseed Oil | 216°C (420°F) | Excellent | Everyday sautéing, neutral flavour |
| Extra Virgin Olive Oil | 160°C – 190°C | Avoid for Initial Sear | Finishing, dressings, low heat only |
| Butter | 150°C (302°F) | Avoid Alone | Add only after food is in the pan or use Ghee |
By respecting the physics of the water drop test and matching it with the correct lipid profile, your stainless steel cookware will outperform even the most expensive non-stick pans.
Read More