There is a familiar and heart-wrenching culinary tragedy that plays out daily in kitchens from Vancouver to Halifax, particularly during the deep chill of a Canadian winter when warm comfort food is practically mandatory to combat the freezing temperatures outside. You assemble your perfectly crafted sandwich, place it into a hot skillet, and eagerly await that satisfying, buttery sizzle. Yet, moments later, the harsh aroma of acrid, burning dairy fills the air, leaving you with a bitterly blackened, charred crust encasing cold cheese that has barely begun to melt in the centre. It is a universal struggle, born from a stubborn cooking habit passed down through generations without question.
But what if the true culprit isn’t your heavy cast-iron skillet or your fluctuating stovetop temperature? Culinary scientists, food chemists, and professional chefs have quietly abandoned the traditional dairy spread in favour of an unexpected, highly efficient pantry staple. By making one simple, scientifically backed substitution, you unlock a golden, shatteringly crisp exterior with a flawlessly gooey interior, challenging decades of sandwich-making dogma and permanently eliminating the risk of a ruined lunch.
The Anatomy of a Burn: Diagnosing the Pan-Frying Problem
For decades, butter has been the undisputed, universally accepted champion of pan-frying bread. However, its chemical composition makes it incredibly volatile under direct, prolonged heat. Traditional dairy spreads consist of butterfat, water, and delicate milk solids. When exposed to the thermal conductivity of a frying pan, the water evaporates quickly, and the fragile milk proteins scorch rapidly long before the internal core temperature of the sandwich is high enough to melt the cheese.
- Symptom: Rapid, aggressive blackening of the bread within the first two minutes of cooking. Cause: Milk solids in the dairy spread burning rapidly at temperatures exceeding 150 degrees Celsius.
- Symptom: A greasy, heavily soggy texture instead of a crisp, satisfying crunch. Cause: The high moisture content (often up to 18 percent water) actively steaming the porous bread rather than searing it.
- Symptom: Uneven browning characterized by pale patches surrounded by dark, burnt rings. Cause: Inconsistent melting and spreading of cold dairy fats across the uneven surface of the bread slice.
To understand why this traditional method consistently fails the home cook, we must look at the exact chemical thresholds and thermodynamic properties of our cooking fats.
The Chemistry of Mayonnaise: An Unlikely Hero
The secret to achieving the ultimate toasted exterior lies in the complex science of emulsions. Mayonnaise is essentially a highly stable emulsion of liquid oil, egg yolks, and a mild acid like vinegar or lemon juice. Unlike traditional spreads, this creamy condiment completely lacks the fragile milk solids that are prone to rapid carbonization. Instead, the naturally high smoke point of the oil and the protein-rich egg yolks work in perfect harmony to catalyze the Maillard reaction—the complex chemical interaction between amino acids and reducing sugars that gives browned food its distinctive savoury flavour and beautiful golden colour.
| Feature | Traditional Butter | Mayonnaise Method | Target Audience & Benefit |
|---|---|---|---|
| Spreadability | Difficult when cold, often tears the bread | Effortlessly smooth straight from the refrigerator | Families and busy professionals seeking quick, damage-free preparation. |
| Heat Tolerance | Low (Burns quickly and unpredictably) | High (Sears evenly with sustained heat) | Novice cooks needing a wider margin of error for heat control. |
| Crust Texture | Dense, heavy, and occasionally greasy | Shatteringly crisp, remarkably light, and airy | Culinary enthusiasts chasing perfect restaurant-quality textures at home. |
But not all fats and spreads are created equal when it comes to navigating the complex chemistry of pan-frying and optimal heat transfer.
Thermodynamics and Dosing: The Scientific Data
- Tomato Paste Must Fry In Olive Oil Before Adding Liquids
- Vodka Added To Pie Dough Eliminates Gluten Development Creating Flakiness
- Garlic Cloves Microwaved For Ten Seconds Peel Flawlessly Without Sticking
- Mayonnaise Replaces Butter On Grilled Cheese Sandwiches Preventing Burned Crusts
- Fresh Celery Wrapped In Aluminum Foil Outlasts Plastic Bag Storage
| Scientific Metric | Traditional Dairy Spread | Mayonnaise Emulsion | Optimal Dosing & Application |
|---|---|---|---|
| Smoke Point | 150° Celsius (302° Fahrenheit) | 204° Celsius to 232° Celsius (400°+ Fahrenheit) | Maintain pan heat at exactly 175° Celsius for optimal, steady browning. |
| Moisture Content | 15% to 18% | Less than 5% (depending on brand formulation) | Apply a highly precise, even layer to strictly prevent steam formation. |
| Application Volume | Variable, often applied too thick leading to saturation | 14 grams (approx. 1 Tablespoon) per individual slice | Ensure edge-to-edge coverage; do not exceed 1 millimetre in thickness. |
Armed with this empirical data, the next critical step is selecting the exact condiment formulation required to guarantee your culinary success.
Navigating the Condiment Aisle: A Quality Guide
Culinary studies demonstrate that the specific brand and style of your emulsion profoundly impact the final resulting flavour profile. While the chemical technique is practically foolproof, utilizing the wrong consumer product can introduce unwanted sweetness or artificial chemical flavours into your savoury sandwich. True mayonnaise relies on a traditional, historical balance of lipids and proteins, whereas inexpensive salad dressings or low-fat alternatives often contain excessive water, artificial thickeners, and high sugar levels that will scorch just as terribly as milk proteins.
| Category | What to Look For (The Gold Standard) | What to Avoid (The Red Flags) | Progression Plan for Chefs |
|---|---|---|---|
| Ingredient Profile | Whole eggs, pure oils (canola/avocado), minimal added sugar. | High fructose corn syrup, modified corn starch, excess water content. | Start with standard commercial premium brands, then progress to avocado oil blends. |
| Product Type | Real, full-fat classic mayonnaise or Japanese Kewpie style. | Miracle style whips, low-fat dressings, vegan spreads heavily diluted with water. | Master the classic full-fat sear before experimenting with infused garlic or truffle aiolis. |
| Texture Dynamics | Thick, intensely gelatinous, and completely opaque. | Runny, distinctly translucent, or overly aerated whipped textures. | Learn to accurately gauge the viscosity at room temperature for the thinnest possible spread. |
Once the correct, high-quality emulsion is secured from your local market, mastering the physical application technique guarantees absolute sandwich perfection.
The Masterclass: Executing the Perfect Golden Crust
Scientific knowledge is only as valuable as its practical application. To truly leverage the extraordinary power of this ingredient swap, you must follow a precise, heavily tested protocol. The ultimate goal is to consistently maximize the Maillard reaction on the exterior while ensuring the internal core reaches the ideal melting point for your chosen dairy, whether it is an aged sharp Canadian cheddar or a complex, imported Gruyere.
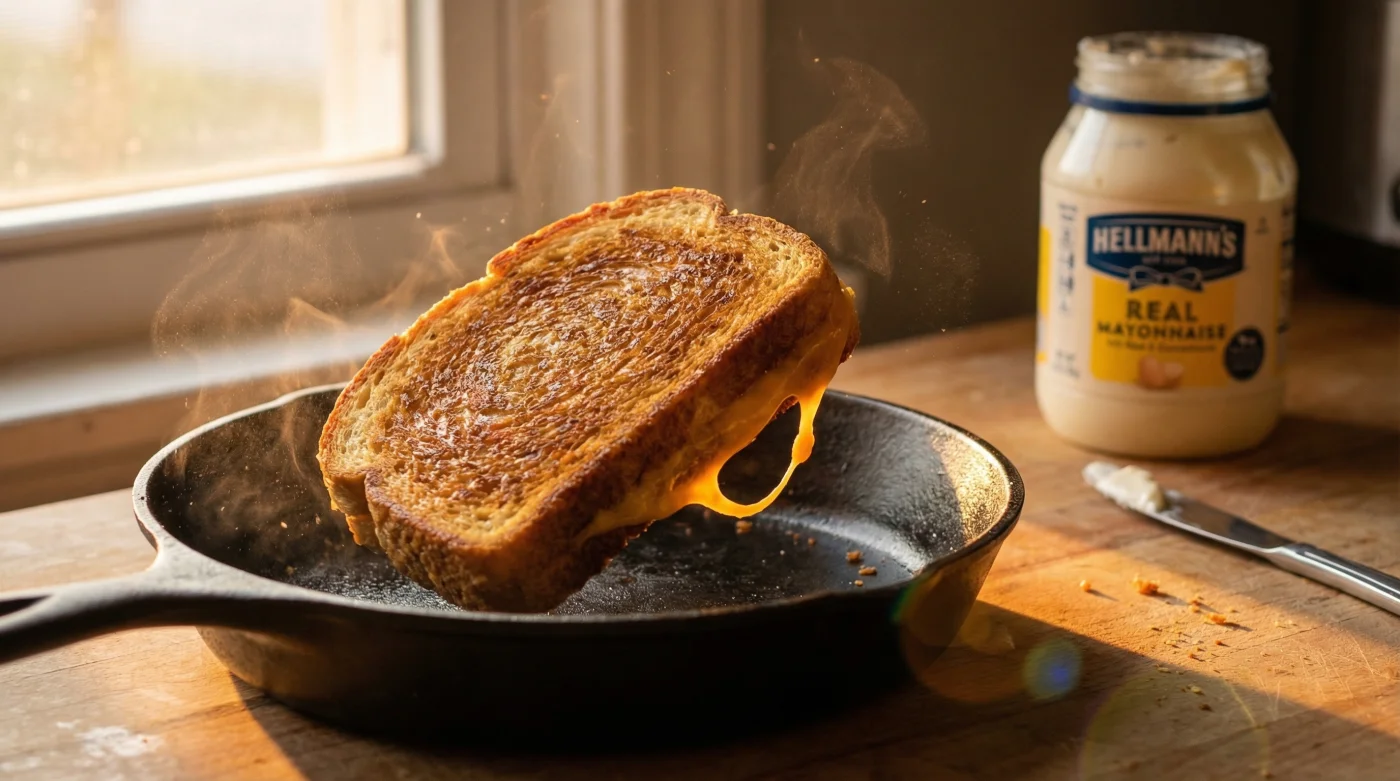
Step 1: The Edge-to-Edge Application
Begin with robust, artisanal bread—a sturdy sourdough or a beautifully thick-cut brioche works absolutely wonders. Using a standard butter knife or a flexible silicone spatula, apply exactly 14 grams (roughly one measuring tablespoon) of your premium mayonnaise to the exterior side of each slice. The layer must be micro-thin but entirely comprehensive. Ensure the coating reaches the absolute very edge of the crust; exposed dry bread will remain pale and unappetizing, while heavily globbed, thick areas will fry unevenly and taste overwhelmingly of oil.
Step 2: Calibrating the Skillet Temperature
Preheat your pan (seasoned cast iron or a heavy-bottomed, multi-clad stainless steel skillet is highly preferred) over medium-low heat. You are aiming for a highly stable surface temperature of approximately 175 degrees Celsius. Do not add any additional fat, oil, or butter to the pan itself; the abundant lipids trapped within the spreadable emulsion are more than sufficient to thoroughly lubricate the cooking surface and actively prevent sticking.
Step 3: The Slow, Controlled Sear
Gently place the assembled sandwich into the preheated pan. You should immediately hear a gentle, rhythmic sizzle, not an aggressive, popping crackle. Allow the sandwich to cook entirely undisturbed for exactly 3 to 4 minutes. The remarkably high smoke point of the oil effectively protects the delicate bread, while the egg proteins bind and crisp to create a microscopic, shatteringly crisp crust. Carefully flip the sandwich using a wide spatula and repeat the process on the second side, pressing down only slightly to ensure maximum, even surface contact with the hot metal.
This seamlessly integrated, scientifically validated method permanently transforms the underlying mechanics of pan-frying, ensuring your next culinary creation is nothing short of an absolute masterpiece.
Read More